Monday, December 27, 2010

The Healthy Whole Grain - Organic Hulled Millet

Millet is mildly sweet and has a slight nutty flavour.
It can be cooked in many ways and added into many dishes.
Like salads and soups. 
Millet flour can be used to make bread, muffins, pitas..and the list goes on...
the most important thing is that millet adds fiber to your meals.

I replaced rice with millet, hoping that my dinner will be healthier.
it's my first try, and feel quite weird eating bird's food! HEHE!


A closer look at millet.
It looks like rice, but a lot smaller in grain size.
I steamed chicken, broccoli, cauliflower and carrot to go with it.
Sprinkled black pepper, and that's my dinner..


It's soft and fluffy,
But guess I need sometime to adjust to this taste.

Now, I would like to share how did I cook the millet.
Use 1 cup of millet : 3 cups of water
Boil for about 20 minutes when water has dried up.
Alternatively, it can be cooked in thermal cooker for 1 hour, or until water drys up.
Fluff the grains with a fork and serve.

Saturday, December 25, 2010

Baked Garlic Chicken with Fluffy Potatoes + Warm Seasons Greetings! =)


The rainy christmas is coming to an end....
Time flies and lets wait for the next holiday! =)
My family came over for a little impromptu gathering..

I made Garlic Drumsticks with Potatoes..as it's easy..
The potatoes were popular~
gone within a short time.


As for chicken drumsticks,
each of us had 1, 
and my younger sis ate 2! =)
Glad that it was all in their tummy now...


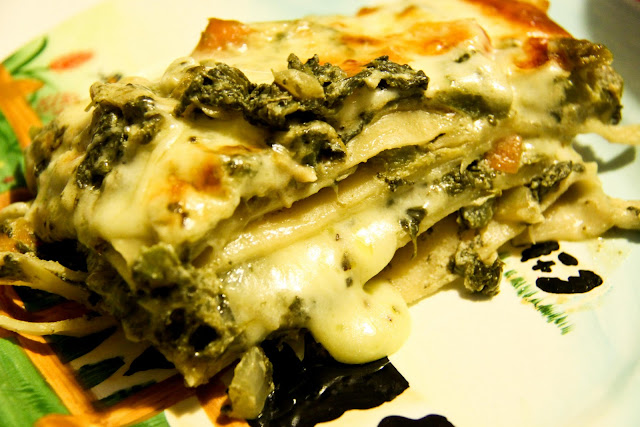
The Lasagna by my brother~
can you believe that this Lasagna's ingredients cost nearly 50dollars in total!
The ingredients are
  • Lasagna noodles
  • Spinach
  • Ricotta Cheese
  • Mozzarella Cheese
  • Oregano
No meat in there...


After cutting it up while it's still hot,
the cheese flow out ~
Woooooo~~


Our dessert from Canele..
This cake is super mini...Serves less than 6...
but costs about 40+ dollars...
Hmm...do you think that it's expensive?

Anyway, we had a fun chatting session too~
our house was filled with unlimited laughter...
I love it...
Another gathering soon.... =)

Hope everyone of you enjoyed your little or big Xmas gathering!
Happy Happy Xmas to all my readers! ~love~


Baked Garlic Chicken with Fluffy Potatoes

Chicken
8 Chicken Drumsticks
2 Bulbs + 4 Cloves of Garlic, Chopped
2 Tbsp of Ground Black Pepper or more
1 tsp Salt

1. Wash drumsticks, and pat dry with kitchen towel.
2. Mix chopped garlic, black pepper and salt together and marinate the chicken.
3. Store in ziplock bag and store in the fridge. Marinate for at least 6 hours or overnight.

Potatoes
8 Yukon/Russet Potatoes
2 Pinches of Salt
1 tsp Ground Black Pepper
Some Olive Oil

1. Cut each potato into quarters.
2. Put potatoes into a pot and add water until it covers all potatoes, 
bring to a boil and boil for another 12 minutes.
3.. Drain water with sieve and put it on top of the hot pot for 1 minute.
4. Pour the hot potatoes back to the hot pot.
5. Sprinkle a pinch of salt and black pepper followed by olive oil and mix well.


To bake:  
 1. Preheat oven to 200 degrees.
2. Lay potatoes evenly on pan and put chicken drumsticks skin side up on top.
3. Drizzle with more olive oil on the chicken.
4. Bake for 30 minutes or until slight brown, and turn drumstick to skin side down. 
5. Bake for another 10 minutes.
6. Turn the drumsticks again, now skin side up. 
7. Bake for another 10 minutes or until golden brown.
8. Serve hot.

Friday, December 24, 2010

To-Die-For Blueberry Muffins


Sorry for the lack of post...
I'm back! =)

With these muffins!
 It looks like a mushroom,
I did not grease my muffin pan, so the muffins got stuck in the pan.
Had a hard time getting them out, some broke.


 It has a crumbly top which is very crispy after baking.
Actually the fragrance started to flow around while it was baked halfway.


This muffin is moist too! 
So its the combination of soft + crispy.
Best eaten warm.
The crumbly top will be even more fragrant and crispier!
HAHA..The name, To die for blueberry muffins seems too serious...
Try it out to find out whether it's really to die for???


To-Die-For Blueberry Muffins

Muffin Mixture
190g All Purpose Flour
150g Caster Sugar
1/2 tsp Salt
2 tsp Baking Powder
80ml Vegetable Oil
1 Egg
80ml Milk
145g Blueberries or more

Crumb Toppings
100g Brown Sugar
40g All Purpose Flour
55g Butter, Cubed
1 1/2tsp Ground Cinnamon

1. Preheat oven to 200 degrees. Grease muffin cups or pan, with or without muffin liners.
2. Combine flour, sugar, salt, baking powder for muffin mixture in a large bowl.
3. Place vegetable oil into a 1 cup measuring cup. Add the egg and enough milk to fill the cup.
4. To make crumb topping, Mix together brown sugar, all purpose flour,  cubed butter, and 1 1/2 teaspoons cinnamon. Mix with fork until crumbly. Or you can use the rub in method.4. Mix wet muffin mixture with flour mixture. Fold in blueberries.  
5. Fill muffin cups right to the top, and sprinkle with crumb topping mixture. 
6. Bake for 20 to 25 minutes in the preheated oven, or until done.  

Recipe Source From: All Recipes

Friday, December 17, 2010

Cooking Porridge with Japanese Short Grain Rice


I used Japanese short grain rice to cook into porridge..
in a chinese style...
To my surprise..the porridge was very thick and gluey~!
Like those store bought ones which had been slow cooked over the fire for numerous hours.

An amazing result!

The 2 other ingredients are chicken thigh stripes and century egg.
A simple meal which is filling.

Try using short grain to cook porridge one of these days...
I know you will love it!

How to cook this? 
1 cup rice : 3 cups water

1. Rinse rice with water and drain, repeat 2 more times.
2. Drain rice and pour into pot, followed by adding water.
3. Soak for about 45 minutes.
4. Cook over high heat to a boil and turn to low heat. Simmer until porridge becomes thick.
Alternatively, you can bring it to boil and put in your thermal cooker for at least 2 hours.
& Enjoy!

Thursday, December 16, 2010

Baked Custard

It's a very simple recipe using just 4 ingredients..
It's milky and if you use your favourite honey, I'm sure u will like it very much.


Has little holes in there because I turned the heat too high during the baking process...
And bubbles started to form.
If not, I'm sure it will be better looking...


Although the holes made the custard look quite weird,
the texture of this custard is very smooth like soy beancurd.
 It doesn't take much of your time to try this out...  =) 
Enjoy baking!


Baked Custard
600ml Whole Milk
3 Tbsp Honey
3 Eggs
A Pinch of Salt

1. Preheat oven to 180 degrees and grease six 1/2cup ramekins with butter.
2. Heat milk until almost boiling, turn of the heat then stir in honey.
3. In a bowl, beat the eggs and salt. 
4. Slowly add the hot milk to the eggs, stirring constantly and mix until combined.
5. Sieve mixture into ramekins and bake in a *bain-marie for 30 minutes of until firm.
6. Cool to room temperature, then chill in the refrigerator.
7. Serve cool

*Bain-marie is what we call the water bath. 
Place ramekin into a baking dish and pour boiling water into the dish 
until it reaches halfway up the sides of the ramekins.

Recipes Source from : Dessert Bible

Monday, December 13, 2010

Cheesy Mushroom Soup


Of all kinds of soup...mushroom soup is definitely my favourite!
I love mushrooms since I was young.
Any kind!
I cooked my first mushroom soup when I was 21 years old,
if i remember correctly.
Ever since, I tried to improve on every attempt.


When I'm cooking this,
fragrance started to flow around my kitchen when butter is melting in the pot.
The fragrance doesn't stop!
I really love it..
the special "aroma therapy".
I'm sure anyone who cooks/bakes, enjoys smelling your own food too!

But it's a pity that I don't have time to bake some crusty bread to go with it. 
It will be great to dip it into the thick soup!
For this recipe, the soup's thick and rich because of the cheese.
Cheese is salty on its own, so I use salt sparingly.
One bowl is definitely not enough for us!
Craving for more...!


Cheesy Mushroom Soup
                (serves 2)
250g Mixed White Button  & Swiss Brown Mushroom
1 Yellow Onion
5 Cloves of Garlic
1 Tbsp Unsalted Butter
400g Chicken/Vegetable Stock
200ml Fresh Milk
3 Slices of Processed Cheddar Cheese
 A Pinch of Salt
A Sprinkle of Black Pepper

1. Chop mushrooms, onion and garlic coarsely.
2.  Heat up the pot, and melt butter. Sauteed onion till soft.
3. Add garlic and keep stirring for another minute.
4. Mix mushrooms into pot and cook till tender.
5. Remove from heat, and pour stock into pot. Let cool.
6. Puree!
7. Return blended mushroom back to pot and send it back to the stove.
8. Mix milk and cheese slices in, and cook over low heat. Stirring occasionally.
9. When little bubbles start to appear, sprinkle a pinch of salt, mix and remove from heat.
10. Serve with a sprinkle of black pepper.

Sunday, December 12, 2010

Rich Chocolate Torte (Yeah! It cracked!)


It's time to have some chocolate-ty cakes for our teatime!
The Rich Chocolate Torte!
An Amazing recipe which only requires a very little amount of flour, 
which results in a cracked & sunken cake..

Actually, If I'm not wrong,
normally flour is not used in torte recipes.
They use grounded nuts...
I think it should be more fragrant...


I'm currently in love with ribbons.
Any ribbons which are affordable in price, I will grab it!
And I think this ribbon with heart shaped printings contrast very well with this chocolate torte!


After cutting the cake up, I took a bite.
Oh My Goodness....
It's super moist! And not really sweet...
Not as sinful as I thought it would be!
My whole dining area was really messy due to the cracked portions.


But it's all worthwhile =)
Here's a slice for you...


Rich Chocolate Torte


170g Good Quality Dark Chocolate, at least 70% cocao 
(I used 72%)

75g Unsalted Butter

4 Eggs

100g Caster Sugar

30g Cake Flour


1. Preheat oven @ 180 degrees. Grease a 9 inches springform pan. ( I used 8inches)
2. Break chocolate and put in heatproof bowl with butter. Double boil it over almost boiling water.
Stir occasionally until it melts. Leave to cool.
3. Meanwhile, put eggs and sugar in a bowl and beat till it triples in volume.
When you lift the beater, it should leave a deep trail on the surface.
4. Add chocolate mixture to whisked egg mixture and fold.
5. Gradually sift flour over the top of the mixture and fold till just combined. Do not over mix.
6. Turn mixture into pan and spread to its edges and level it.
7. Bake for 20 minutes until the top of cake feels firm, or when skewer comes out with a few moist chocolate bits. Leave to cool in tin before unmoulding.


Recipe source from : All Recipes (UK)

Friday, December 10, 2010

Homemade Organic Soy Milk


When I'm out, my choice of drink will be Hot Soy Milk with no sugar.
I think it should be the healthiest choice...
and this is my homemade version.
Simple yet tasty!


Loads of protein & nutrients in a cup...
 Some may not be used to the soy taste if there's no sugar content.
But I love the pure taste without any other additions.


Homemade Organic Soy Milk

6 Tbsp Organic Soy Beans (Soaked for at least 6hours)
800ml Water
4 tsp Cane Sugar (optional)

1. Blend soaked soy beans and water together for 1 1/2 minute.
2. Filter it with cheesecloth and transfer soy milk to pot.
3. Boil on medium fire until there's bubbles at the sides, stirring occasionally.
4. Remove from heat and stir cane sugar in. Serve hot/cold.

PS: You can keep the okra(left over solid) to use in other dishes!

Thursday, December 9, 2010

Milk Rice With Salmon

In a Japanese travel show, I saw this man cooking rice with milk instead of water.
It's a great idea! So I tried..!
I can't remember the contents of the show,
the ingredients that I can remember are only rice and milk, he cooked on the stove, and i cooked mine with rice cooker.

So here's mine, with some changes...
Milk rice topped with salmon and broccoli...


 I can barely taste the milk.
But it's really very fragrant..

My pictures are abit blurry and grainy as I think there's something wrong with my lappie or cam,
the file size seems to be really small..
got to find out the reason.
Hope to have clear pictures soon~!
Here's the recipe for the Milk Rice,
I believe that children will love it...


Milk Rice With Salmon
(serves 2)

1 cup Short Grain Rice
1 3/4 cup Milk (I used Farmhouse low fat)
6 cloves minced garlic
Salt and black pepper to taste
Salmon cut into 1/2 inch slices.
Broccoli cut into small florets

1. Wash rice. Mix mince garlic, rice and milk together.
2. Cook in rice cooker till cooked, timing depends on individual cooker.
3. When rice is cooked, add in a pinch of salt, few sprinkle of black pepper and mix well.
4. Lay salmon slices and broccoli on the rice and cook for another 5 minutes, or until salmon is cooked.
5. Sprinkle more black pepper onto rice before serving.
To add extra fragrance, top rice with unsalted butter.

Tuesday, December 7, 2010

4th December has Passed....

Finally..our wedding is over and I'm back blogging!
My daily life was a bit hay-wired for the past 1 week..
too too too busy!
And i definitely failed in my diet plan..HEHE..i looked gigantic~
but anyway it's over, and nothing can be done.


2 photos for sneak preview of my wedding day...
these are my fun loving brothers and sisters....
they are all couples, plus us, there's 5 couples together~!
they helped us through the whole day long...
and we were all tired!
If not for them, our wedding will be boring and in a mess..
a BIG thank you to all !!


this is @ my parents' place..Lagoon View,
scenery is much nicer..
and it was drizzling...

Although i heard many complains about the banquet service and food, a bit disappointed.
I'm still glad that friends were there for us when we needed them...
Yippie!!

Will blog about food soon again!! 
No more diet formulas for me for the time being!! HEHE!!

Friday, November 26, 2010

Homemade Granola Bars

I used to buy granola bars from supermarkets for my snacks,
as I need to travel, sometimes I get really hungry and there's absolutely no time for me to grab a bite.
So these bars help me to regain some energy!
But hey~ nothing is better than homemade ones!


This is my first attempt in making these...
I looked through Alton Brown's recipe
but did not follow exactly as I wanna use the ingredients that I have.
It's a pretty flexible recipe!


I used these organic multi puffs..


This pack consists of Hulled buckwheat, Sorghum, Brown rice
A really wholesome food~ 100% whole grain~
Eat it like your cereal! Definitely healthier!


Doesn't it look great!?
My batch was not really firm, I will increase the honey and reduce the sugar the next time~
Those bits which became loose can be collected and eaten with milk for breakfast or snacks..
Awesome!

Taste wise, I can't comment now.
I've lost my sense of smell from the irritating flu!
Argh! I can't taste any of my food too~


But still, I'm going to bring some along with me tmr as it's a long day for me~


Homemade Granola Bars


180g Rolled Oats
35g Multi Puffs
100g Whole Almonds
100g Sultanas (soak in water for 10 minutes, drain and cut briefly with scissors)

110g Butter
70g Brown Sugar
60g Honey
1 1/2 tsp Vanilla Essence/Extract
A Pinch of Salt

1. Toast rolled oats, multi puffs and almonds in a preheated 180 degrees oven for 15minutes. Stir ocassionally.
2. While toasting, melt butter over low heat. Add brown sugar, honey, vanilla essence/extract and salt. Stir continuously. Remove from heat when sugar has dissolved.
3. When dry mixture is done, remove from oven and pour it into the wet mixture immediately. Add sultanas and stir until combined.
4. Butter a 11" X 5" pan, and pour mixture in. Spread evenly and firmly.
5. Bake in 170 degrees oven for 25 minutes or until golden brown. 
6. Let it cool completely before cutting.
7. Store in an airtight container, and it can be kept up to a week.

Wednesday, November 24, 2010

Vegetarian Shrooms Fried Rice


Sorry for the lack of post...
I was down with flu, sore throat and fever for the past 3 days,
and my wedding is next week! 
Luckily it did not happen on my big day.


The day before I fell sick, 
I made this for dinner...


2 kinds of mushrooms in the fried rice,
Enoki and Shitake...
Just fry garlic in oil and stir fry all the ingredients together with some Japanese Sukiyaki Sauce..
& done~ very easy~
OK I know all these are boring food..

I'm craving for some sinful desserts right now!
After my wedding, I will bake all sorts of evil desserts!!!
Wait for me!! =p

Sunday, November 21, 2010

The Healthy Pumpkin Soup


The thick soup with no oil, butter or cream...


Just 3 simple ingredients!
Pumpkin, water and milk~!
But it taste just as nice~~Yummy~~


it goes so well with freshly baked homemade crusty bread..


I specially made just 1 small loaf to have it with the pumpkin soup.
That's all for our dinner! =)


The Healthy Pumpkin Soup

600ml Water
700g Pumpkin (Cut into 2 inches pieces)
150ml Low Fat Fresh Milk
A Pinch of Salt

1. Mix water and pumpkin together in a pot. Bring to a boil and turn to low heat.
2. Simmer until pumpkin is tender.
3. Remove from heat and let cool.
4. Puree!
5. Heat again and mix fresh milk in.
6. Simmer until bubbles can be seen at the sides of the pot.
7. Serve, and drizzle fresh milk on the soup as desired.

Saturday, November 20, 2010

The Fresh Strawberry Bread


I've not been baking for quite awhile...
Yesterday, I baked 2 kinds of bread.
One crusty bread and this, the Fresh Strawberry Bread...

This bread is filled strawberry slices!


It's a very moist cake...!
A no butter recipe...very easy to make. 
Measure, mix & bake~!

It's nice to be eaten warm or cold.


The Fresh Strawberry Bread

200g Sliced Fresh Strawberries
195g All Purpose Flour
180g Sugar
3g Ground Cinnamon
3g Salt
3g Baking Powder
3g Baking Soda
150ml Vegetable Oil
2 Beaten Eggs
70g Chopped Pecans (I omitted this)

1. Preheat oven to 175degrees.
2. Combine flour, sugar, cinnamon, baking powder & baking soda in a large bowl. Mix well. 
3. Blend oil, beaten eggs into strawberry slices.
3. Add strawberry mixture to flour mixture, blend until dry ingredients are just moistened.
4. Stir in Pecans. Do not overmix!
5. Pour batter into 9" X 5" loaf pan.
6. Bake for 45 to 50 minutes, or until skewer comes out clean.
7. Let it cool in pan on wire rack for 10 minutes. Turn loaf out & cool completely.

Recipe Source From: All Recipes

Thursday, November 18, 2010

Nabemono, The Japanese Steamboat


Nabemono...nabe stands for big cooking pot and mono for things.
The one pot wonder..
prepare, wash, arrange. Done!


Add water...
And I added sukiyaki soup base for short cut =p


This is Shirataki.
Konnyaku in the noodle form.
They have it in 2 colours, white and dark grey.

Now I personally prefer Shirataki,
as it's easier to eat!

Anyone went to buy Kanten??????

Monday, November 15, 2010

The Kanten Diet (The Natural Way)


This is Kanten 寒天
My uncle introduced this to me, 2 weeks ago. 
It's a kind of Japanese Agar Agar Powder made from 100% seaweed extract.

How to use it?
there's 4 sachet in a box, 
dissolve one sachet in half mug of VERY HOT BOILING WATER.
It must thicken in order to work.

Drink it before your meal. 
It's meant to trick your body into believing that you are feeling full,
hence you will actually take in less food.

Since 2 weeks ago till now, I'm only on my 4th sachet.
Not very hardworking on this plan, 
only drink it before some day's dinner.
But i feel that my appetite has became smaller.

Another thing to take note of when you take this is,
you have to drink lots of water! At least 8 glasses a day.
& according to my uncle, it will block out some of the food's nutrients,
so not advisable to take for a long period. 

I searched online, and a website stated that some people got choked by this too.
As it's very thick~
So take extra care if you want to try.

It helped diabetic people to regulate their blood sugar by taking in less food.
And people who are obese benefits from it too.
Although weight loss result is slower than all those crash diets,
I feel healthier, as I still get to eat the things that I want to,
just in a smaller portion and there will be less cravings for food~

You can get it @ Medi-ya, Liang Court,
$4.50 per box, 
not cheap, can just get one box first to just try it out.

If you are not using it for diet purposes, 
with Kanten, you can whip up lots of delicious food and desserts!
I will show mine soon! =)
Hope all these information helped.

Saturday, November 13, 2010

Roasted Edamame Salad


Have you tried roasting Edamame before?

I did it~
A healthy vegetarian dish! Suits me really well~~

I was inspired by Alton Brown from Good Eats.
I love to watch his show, really creative & always interesting~!
Lots of explanation done, from chemistry to physics..
Actually any kind of explanation about food~
A great program!


I did not follow the recipe closely,
just adapted his idea of roasting all these ingredients together.


Topped my brown rice porridge with this salad, 
and that's all for my dinner.
felt good without feeling sinful~!
 And it's easy to make..take a look at the recipe =)

Roasted Edamame Salad


1 Cup Shelled Edamame
1 Cup Corn Kernels
15 Cherry Tomatoes
1 Head of Garlic, Minced
1 Medium Yellow Onion, Chopped
1/2 tsp Black Pepper
A Pinch of Salt
1/2 tsp Olive Oil

1. Preheat oven @ 200 degrees.
2. Mix all ingredients together. 
3. Place them in an oven proof dish.
4. Bake for 15 minutes.
5. Serve it hot or refrigerate it to serve cold.

Friday, November 12, 2010

Konnyaku - Eat And Lose Weight!


Some may be wondering..
What are these dark in colour slimy looking thing..
They are actually Konnyaku (Devil's Tongue).
For Chinese, they call it 蒟蒻,
& many more names.

I first had konnyaku when I was really young,
I didn't know that it's such a wonderful food,
until my blog reader, Tricia from Canada told me about it 2years ago.
Thanks Tricia! =)

What's Konnyaku?
It's made from Konnyaku potato some call it yam and calcium (may be extracted from eggshells)
If I'm not wrong, 90+% of the block is water.

It does not have fat, rich in dietary fibre and is low in calories. 
It can normalise cholesterol level, blood sugar and pressure!
Isn't it wonderful?!
A more interesting part is, it helps in losing weight too!
as 1 serving  only contains 10 calories!
Amazing!
So, just substitue your rice/noodles/pasta with Konnyaku,
your calorie intake will be definitely much lower!

Konnyaku is jelly like but much more chewy and harder.
Have to really chewy properly before swallowing,
many people got choked by attempting to suck Konnyaku like a jelly.
& another reason for chewing properly is that Konnyaku doesn't break down in our body!
Sounds scary? 
You just have to chew patiently! =D

My simple lunch here...
Miso soup base with sliced Konnyaku, fish and vegetables.
I guess this meal is really low in calorie!


You can get it from Meidi-ya or cold storage.
Any brand will do...


I bought the cheapest brand..cost $2.45 for 1 block.
Look out for this grandmother! =)

Happy dieting!
More to share with all of you soon~