Thursday, July 28, 2011

Chocolate Chips & Almond Biscotti (Without Butter)


Many of you must be familiar with Biscotti...but it's my first time baking it..!
Biscotti actually means 'baked twice'..
It's really baked twice...once before cutting & another time after cutting.

What made me wanna make biscotti out of a sudden?
Yesterday, I saw my student munching cookies from goodwood park hotel.
There were a few varieties, and one of them was biscotti!
I couldn't get it out of my head and searched for a recipe in the morning.
I chanced upon this recipe which uses oil and not butter..
I knew that I need to try it,
so I did it immediately before going to work! =)
It's best for afternoon tea, with a cup of coffee..!
Yum yum yum..crispy biscotti with crunchy almonds and melted chocolate dipped in bitter coffee..
imagine that...
I bet you will wanna make some now!


Next time, I will try those recipe with butter and see what's the difference...


-------------------------------------------------------------

Chocolate Chips & Almond Biscotti


 3 Tbsp Olive Oil (I used sunflower oil)
110g Sugar
1 tsp Vanilla Extract/Essence
1 Egg
150g All Purpose Flour (I used 130g flour+20g Wholemeal flour)
1/8 tsp Salt
2/3 tsp Baking Powder
1 Handful of Bittersweet Chocolate Chips
1 Handful of Almonds


Preheat oven to 160 degrees.

1. In a large bowl, mix together oil and sugar. 
2. Mix in the vanilla and egg. Add 1 cup of flour, salt, and baking powder, and stir thoroughly. 
3. Add chocolate chips and mix until incorporated evenly.
4. Form the dough into a thick log on a parchment-lined cookie sheet. Brush with egg.
(If dough is a bit sticky to handle, put it in the freezer for a few minutes before forming the log)
5. Bake for 35 minutes, or until log is slightly golden.
6. Remove from oven, cool for 20 minutes. Reduce heat of oven to 150 degrees.
7.Cut the log at a diagonal angle (approximately 30 degrees) into 3/4 inches thick slices.
8. Lay cookies on their sides on parchment cookie sheet. 
9. Bake approximately 9 more minutes, cool, and serve.


-----------------------------------------------------------
Recipe Source from : Sugarlaws

Wednesday, July 27, 2011

My Failed Swiss Roll


Ahhhh.no pictures to share for this post..
It's my first time to bake a swiss roll and it was a total flop~haha!
It was too hideous till I didn't even bother to take a picture.
I was trying to act smart and used my favourite chocolate sponge cake recipe 
to bake in a rectangular glass pan, not a standard swiss roll size pan.
& after baking, I thought that moisture should be locked in the cake, 
so, I covered the baked cake with another tray =) 
some water from condensatin dripped onto the cake!
In the end the cake was really very soft and moist!

After spreading the buttercream (my first attempt too),
I started to roll...
It was so hilarious! HAHAHAHA!
there was a major earthquake which led to huge cracks! 
I told my man that he will laugh till his head drop when he sees this "swiss roll"

He came back from work, first thing was, look what's in the fridge.
I think he was shocked to see the cake! HAHA!
but wait..after taking a bite, he kept eating and eating, half was gone!
He said that it's really yummy..like store bought kind of taste and texture. 
I was still pleased at the end of the day...because the cake's gone!! in less than 12 hours..

So now I'm here to request from my fellow bloggers for some trusted Swiss roll recipe?
Please let me know..I wanna try baking it again! =)


Monday, July 25, 2011

Assam Penang Laksa (My Man's the Chef)

We had a Penang Laksa + Potluck Party held at our place on last Saturday.
There were 35 of them..squeezed into our little house =p

I baked banana cake for them and most of them commented that it's nice!
 one of them even told me, among so many food, the nicest is my banana cake! He had about 6! 
I really appreciate this kind of comment...
I woke up really early before going to work and baked 2 batches, my hard work paid off!

Since it's a potluck, my guests brought one kind of food/dessert for each family.
We had Hainanese Chicken Rice, Curry Chicken, Fried Starch Porridge with Spicy Dried Shrimps, Yam Kueh, Steamed Glutinous Rice, Fried Taiwan Sausage, Roasted Pork Belly, Roasted Duck, Mixed Vegetables, Cocktail & Kuehs. 
What a feast!!! 
Why are there no pictures?? I accidentally overwrote them!!!

& actually the Penang Laksa was not a hit for this party.
Some of them don't fancy Penang Laksa...But the whole super duper big pot of soup was gone~
My man and I did not have time to sit down & enjoy the food + his own Penang Laksa.

In the end, we had some leftover ingredients and decided to have an Encore!!
He cooked Penang Laksa on Sunday once again! 


here's the 2nd day's Laksa..
It tasted better!
Extremely sour and spicy!


Lets see what are the ingredients....
there's cucumber, lettuce, peppermint leaves, onions and ginger flower...


Get ready a large spoonfull of prawn paste!


Drizzle the hot soup over these ingredients..
Mix everything together..
Very appetising! My mouth will always water when I smell or see this!

This round of laksa was super duper spicy till my man and me cannot take it!
We drank fresh milk to ease the spiciness...and this action led to runs to the toilet!!!
So we are still running to the toilet till now....

However, we had a good weekend!! =)  hope to have more potluck party in future..!

Thursday, July 21, 2011

100% Durian Puff


This is my first attempt on baking choux pastry!
Was quite nervous...
 I was thrilled to see the puffs rise nicely in the oven!
When the puffs were ready, 
the sky got really dark and thunder came! 
so I had some "gloomy" pictures!


I did not add any whipped cream for the fillings as I wanted it to be 100% natural.
No additional icing sugar too~
Don't wanna add anymore fats and sugar to these homemade puffs.
But I think these choux pastry did not meet my expectation..
I was expecting it to be soft, but it turned out to be the crispy kind...
I wonder is it because I forgotten to spray the puffs with water before baking them?
However, I will still continue my hunt to get one which suits my taste =)


Anyway, my man loves them very much!
I stopped him from eating, if not all will be gone in less than a few minutes!


-----------------------------------------------------------

100% Durian Puff


85ml Water
50g Butter
A Pinch of Salt
1/4 tsp Sugar
1/4 tsp Vanilla Essence
50g Bread Flour
20g Cake Flour 
2 Eggs (Lightly Beaten)

1. Cook water, butter, sugar, salt and vanilla essence in a saucepan till bubbling hot. Turn the heat to low.
2. Add in the flour mixture in one go and mix with a wooden spoon till a dough is formed
3. Still on low heat, cook the dough for 1 – 2 minutes till a thin white film is formed at the bottom of the saucepan.
4. Transfer dough to a mixing bowl and beat till it is lukewarm.
5. Add in egg by thirds and mix till well blended and smooth. It needs to be glossy looking. Test the batter by taking a scoop of it and it hangs down and form a smooth triangular shape, it means u’re on the right track.
6. Place batter into piping bag and pipe it onto a lined pan in rounds of about 5cm in diameter. Spray some water on it. (I piped mine into 2 cm roses and I forgotten to spray water.)
7. Gently smooth out the pointed peaks with a moistened finger.
8. Bake at 200 degrees for 25 minutes then 180degrees for 8 – 10 minutes or till dry and golden brown in color. (Mine was bite size, took 15 minutes for 200 degrees and another 15 minutes for 180 degrees.)

----------------------------------------------------------

Original Recipe : Do What I Like
With Illustration : Maameemoomoo

Thursday, July 14, 2011

Kuih Bahulu 鸡蛋糕 Egg Sponge Cake

Wondering what's Kuih Bahulu? Take a look at the picture HERE

It's a kind of traditional egg sponge cake, baked in cast iron moulds.
Thanks to SONIA, we can now bake Kuih Bahulu in muffin cups/pans!


I baked mine using cuppies and muffin pan.


the cake rose really nicely...
I filled each cup 95% full with batter..I love how the cakes rise high up!


It's soft and spongy plus really light!
slightly dry in texture, but it's supposed to be this way =)
I only beat the egg for about 15-20 minutes on low by handheld mixer.


Not to forget those baked in muffin pan...
Golden Brown~~~
How tempting....


My lovely Piglet is hungry again! HAHA!

and notice that these pictures are a bit brighter than usual? 
I've found a better spot in the house to take pictures,
next to my rubbish chute!
but the area is not dirty at all, I've sealed up the rubbish chute long ago to deny access to pests!!


Anyway...
I'm sure if you bake this, it will bring some childhood memories back to you! =)

-----------------------------------------------------------
Kuih Bahulu 鸡蛋糕 Egg Sponge Cake
5 Large Eggs, Room Temperature
150g Caster Sugar
170g Cake Flour
1 tsp Baking Powder
2tbsp Melted Butter (I replaced with oil)

Kuaci (Melon seed)


1. Sift cake flour and baking powder, set aside.

2. Beat eggs and sugar over low speed in a mixer for 30mins or until the batter is thick and creamy (or you can write a letter "O" on the surface of batter and it should stay there for few seconds)

3. Add in melted butter spoon by spoon. (I used a spatula to fold in for this and flour)

4. Slowly add in flour mixture, also spoon by spoon until batter well combined.

5. Pre-heat oven at 180c and also heat muffin pan in the oven at the same time.

6. Remove muffin pan, brush butter on the bottom and side of each muffin mould.

7. Pour batter into muffin mould (about 80% full), bake for 20-25mins or until golden brown.

--------------------------------------------------------------

Tuesday, July 12, 2011

Stir Fried Quinoa (Vegetarian)

Quinoa is actually not a grain, it's a seed of a leafy plant that is related to spinach.
Quinoa's very high in protein and amino acids...
they are ideal for diabetics because of its low GI!
you can read more HERE...there's lots of nutrients in there!
This is my first time trying to stir fry Quinoa with some colourful ingredients!
I'm sure this is packed with loads of nutrients!
I had this for lunch today...


The ingredients in there are 
  • Cooked Quinoa
  • Garlic
  • Pumkin
  • Mushroom
  • Black Fungus
  • Carrot
  • Xiao Bai Cai

Healthy right?!
I just used about 1/4 tsp of oil and 1 tsp soy sauce.
1 big plate = full tummy!

It's just like any other chinese stir fried dishes..but much healthier!!

Friday, July 8, 2011

Baked Black Pepper Chicken Chop

Whenever we feel like eating some western food at home,
I will bake chicken! 
That's the most convenient way~! (Although not authentic..hehehe)
I need not worry about splattering of oil or cleaning up the oily wok!
The ingredients under the chicken chops are butternut squash, russet potatoes, 
carrots, yellow onions and broccoli!


I seasoned the chicken chop with minced garlic, soy sauce, lots of grounded black pepper 
and yellow onions for 6 hours.
It's best to use russet potatoes, it gives you a really fluffy texture!
Before baking you need to boil a pot of water, cook the potatoes (cut into quaters)
and boil for 8-10 minutes.
Drain and allow to steam dry on sieve over the hot pot for 1 minute. 
Return the potatoes to the same pot. 
Toss the potatoes with some salt, grounded black pepper and a little butter/olive oil. 
The potatoes will surely be really yummy!
Before baking, brush the veggies + chicken chop with some olive oil.
(make sure the chicken covers the broccoli's flower heads, 
so that they will not dry up during the long baking time)

Bake for about 40 minutes. Enjoy!


Tuesday, July 5, 2011

Old Fashioned Butter Cake

I'm now really into these old fashioned cakes after baking the banana cake last week!
I think next up will be butter walnut cake!
I've baked some butter cake before this, 
and I can say that this is the best so far! =)
the other recipes uses whole eggs to beat, but this is using the egg separation method.
It yields a softer and fluffier cake!
I must say that I'm really poor in taking cake pictures...
I can't seem to find the "important" focus! haha..
so please pardon me...
Plus, I really don't like the poor lighting in my house...


I hope you can see the texture of this cake...
I suspect that my mixer is too fast..even when it's on lowest speed.
so there are many bigger air bubbles in my cakes...
I don't know what to do now =(

But still..this cake was well received, even by my 1year+ niece.
She ate a bit and asked for more and more!

I just had a tiny slice and I will refrain myself from eating more..hehe..
but..it's really a slice of goodness!!

It's so fragrant that when my man opened the cake tray cover,
the smell actually flowed to me...
so I knew that he's "stealing" some butter cake to eat! HAHA!


 ------------------------------------------------------------

 Old Fashioned Butter Cake


250g Butter (I used SCS Salted Butter)
100g Sugar
5 Large Egg Yolks (I used 6 medium)
230g Cake Flour
1 tsp Double Action Baking Powder
4 Tbsp Milk (I used evaporated milk)
1/2 tsp Vanilla Essence

5 Large Egg Whites (I used 6 medium)
90g Sugar


1. Place the butter, sugar and vanilla in a bowl. Use an electric mixer to beat until light and creamy.
2. Add the egg yolks, one at a time, beating well after each addition. Add the flour and baking powder and beat well to combine. Fold the milk in and combine well.
3. Beat egg whites in a clean large bowl until it becomes soft foam. Gradually add in sugar, and beat till soft peak.
4. Take one portion of the egg white mixture, and use a hand whisk/spatula to stir well with egg yolk mixture till combined into a thick paste.
5. Slowly fold in the balance egg white with a spatula till well mixed.
6. Pour batter into a 8inches cake pan lined with baking paper and grease lightly.
7. Bake at preheated oven at 180c for 55mins or until cooked, it's done when the skewer comes out clean.

------------------------------------------------------

Recipe Source from : Nasi Lemak Lover (Sonia)

Monday, July 4, 2011

Chee Cheong Fun 豬腸粉 Rice Noodle Roll

I am actually a Dim Sum person! 
I love everything served in a Dim Sum restaurant...
Who doesn't? =)

I decided to make some chee cheong fun yesterday for our dinner~
I used the same recipe 3 years ago....
This recipe doesn't require Borax powder..
this powder is actually not good for us in large quantity.
It helps the chee cheong fun to be elastic, less sticky and have a nicer texture..
You can read about Borax powder HERE...


I must say that this recipe is OK...
without the powder we can't achieve those standards served in restaurants.
But I'd rather eat these! Healthier! =)
I only used a little oil to brush the pan, so the cheong fun was sticky...
that's why it's so ugly..hehe
wrapped some with prawns and the others with ham.
I love prawns while my man loves ham!
I must say that the sauce is somewhat close to those served in restaurants.
very yummy!

I will make it again when I have the time !
---------------------------------------------------------

Chee Cheong Fun 豬腸粉 Rice Noodle Roll

Cheong Fun
150g Rice Flour
1 ½ Tbsp Wheat starch flour
2 Tbsp Corn flour
1 Tbsp Oil
2 cups Water
½ tsp Salt


1. Sift dry ingredients together.
2. Slowly add the water, mixing as you add.
3. Lastly add the oil and salt and mix thoroughly. Set batter aside for at least an hour.
4. Prepare your steamer. Grease a swiss roll pan or any aluminium tray with oil and pour the batter directly on the pan and steam for 5 mins.
5. After steaming, using a plastic scrapper roll the ccf up. If you are using ingredients like char siew or prawns, you can sprinkle it over the steamed ccf and then proceed to roll it up.
6. Place in a plate brushed with a little oil. Continue with the rest of the batter. 


Sauce
Ingredients
1 tbsp oil
2 tbsp sugar
a few slices of ginger (optional)
½ cup water
4 tbsp mushroom flavoured soy sauce or normal light soy sauce
½ to 1 tbsp dark soy sauce

1. Place ginger with oil and sugar in a pot. Cook over small fire until sugar turns brown.
2. When sugar is brown, add in the rest of the ingredients. (Beware of the splatter!!)
Cook over medium fire for about 5 mins. Taste the sauce and adjust taste accordingly. 
If you find the sauce too sweet, you can add in a bit of salt.

------------------------------------------------------

Recipe Source from : Baking Mum

Saturday, July 2, 2011

Banana Cake (The Power of Home Baked Cakes!)


Finally..I can totally feel the power of home baked traditional cakes!
This cake really gave me a nostalgic feeling...
brought back some childhood memories while I was eating a slice..
This was the look of the cake b4 baking....


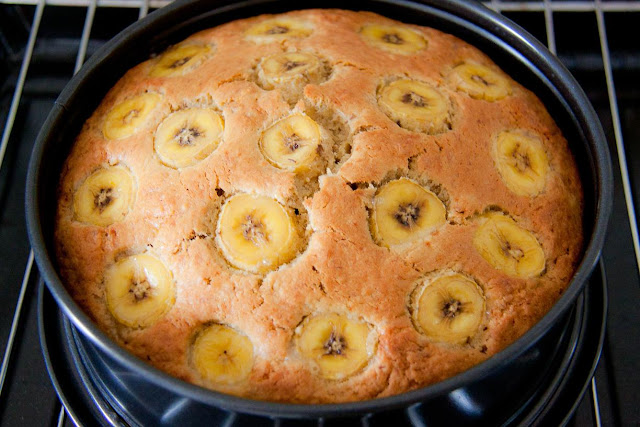
& after baking...
Earthquake! HAHA!
The slices of bananas made the cake looked quite "nasty"...
But wait....Do not judge a cake by it's cover!!
the taste was..ermm..Bombastic!!


I couldn't wait for the cake to cool down completely, 
got myself a slice and enjoyed it for tea while it was still warm...
I must admit that it's really extremely fragrant!


I feel so satisfied...
The taste was really rich! No banana essence used!
I cut down on butter and sugar..so it's not over oily or sweet, which I love!
My man said it's a bit dry for him, but still good! (Maybe the reduction in butter)
Actually for me...I feel that it's totally fine! Everything is just right!
I guess different people have different taste and opinions...
let me know your feedback after baking this cake! =)


----------------------------------------------------------

Banana Cake

180g Butter (I used 140g Unsalted Butter)
180g Fine sugar (I used 70g White Sugar & 30g Brown Sugar)
2 Extra Large Eggs - Lightly Beaten
250g Cake flour
1 tsp Baking Powder
1 tsp Bicarbonate of Soda
220g Bananas - mashed (I used 250g)
50g Dairy whip cream (I used evaporated milk)
1/2 tsp Banana essence (I replaced with 1 tsp vanila essence)
2 bananas - Sliced

1. Cream butter and sugar till light and creamy.
2. Pour in eggs gradually and beat till creamy.
3. Add in whip cream (evaporated milk), mashed bananas and banana essence(vanilla essence). Mix well.
4. Add in cake flour, baking powder and bicarbonate of soda and beat for a while only.
Do not over mix!
5. Pour into an 8" round tray, and arrange sliced bananas on top.
6.  Bake at 175C for about 50 to 60 mins. or until skewer comes out clean.
(I let the cake cool in pan)

-------------------------------------------------------------

Recipe Source from : Yochana's Cake Delight