Sunday, October 31, 2010

Bloody Fat Witch's Fingers


Hooooooooooooooooo.....

Those fat fingers are slowly creeping up to u~~
Scary Yeah!?
Today's Halloween! 
I don't celebrate at all,
but thought of making these fingers to have some Halloween mood =p


These are actually shortbread...
They are pretty yummy!! Ermm..provided if you have the courage to pick up 1 and try it.
A very simple recipe, with just 4 ingredients!

& not forgetting to wish everyone...Happy Halloween!!! =)


Shortbread Cookies

100g Butter (softened)
45g Sugar
110g All Purpose Flour
5g Cornflour 

1. Preheat oven @ 170 degrees
2. Cream butter thoroughly and slowly add sugar.
3. Sift all purpose flour and corn flour, mix well into dough.
4. Chill in fridge for 30 minutes.
5. Shape into slim finger shapes.
6. Use whole blanched almonds as nails and red food colouring for blood.
7. Slash on the fingers to create knukles.
8. Bake in oven for 30 mininutes or until slight golden brown.
9. Cool for 10 minutes before transferring to cooling rack.
10. Keep in an airtight container.


Recipe Source From : All Recipes

Friday, October 29, 2010

Vegetarian Stir Fried Kishimen


Another vegetarian meal...a nearly sinless and easy recipe

That was for our lunch a few days ago too...

these few days I overate once again =(
I should say sorry to myself..just 1 month+ left and I'm still doing this.
*sigh*
So from now, I will continue to post some healthy food,
and I hope it won't be too bored for all of you!


There's my favourite, edamame!
Actually I had no more ingredients to add, only left with veg and carrots,
so had the idea that I can use these beans~


Vegetarian Stir Fried Kishimen

2 Servings of Cooked Kishimen/Udon/Soba
1tsp Oil
1 Medium Yellow Onion
1 Handful of Edamame 
1 Handful of Vegetable (I used Shanghai green)
1 Medium Shredded Carrot
2 Tbsp Water+1/2 tsp Dashi Granules+1/2 tsp soy sauce
1 Handful of Shredded Dried Seaweed

1. Sauteed onion in oil until soft, and add edaamame, shredded carrot. Stir fry for 1/2 minute.
2. Put cooked kishimen/udon/soba, vegetable & water+seasoning in then continue to stir fry for another 1-2 minutes.
3. Serve on a plate and sprinkle with generous serving for seaweed.

Wednesday, October 27, 2010

Healthy Vegetarian Spaghetti


We are on vegetarian meals these few days.
somehow, I don't really include meat in my meal plans when i cook.
So poor man has to go meatless =P

I woke up at 6+am to prepare for his lunch to be brought to work.
and I will have the same type of food as him for my lunch.
As he got to leave at 7am, I had to get everything done fast
So I cooked the spaghetti the night before, 
and refrigerated it.
As for cutting of ingredients, mushrooms and capsicums are pretty easy to be handled.
So this was our lunch~
Somewhat filling and definitely a healthier choice..


Healthy Vegetarian Spaghetti (Serves 2)


1/2 Packet of Spaghetti
1 tsp Olive Oil
1 Tbsp Garlic
1 Cubed Capsicum
6 Portobello Mushrooms
1 tsp Dried Basil
1 tsp Black Pepper
1 Tbsp water + 1/2 tsp salt/soy sauce


1. Cook spaghetti by following the directions on the package. Drain and set aside.
2. Sauteed garlic in olive oil until it's fragrant.
3. Put capsicum and mushrooms in and cook for 1 minute.
4. Add spaghetti, and mix well.
5. Sprinkle basil, black pepper and cook for another minute. Stir constantly.
6. Lastly, add water and salt/soy sauce, count to 30 seconds while stir frying and remove from heat.
7. Before serving, sprinkle more black pepper and basil on spaghetti.

Tuesday, October 26, 2010

All Natural Minstrone Soup from Scratch


I love my food without any preservatives...
For this Minestrone Soup, 
there's whole lot of goodness in there!
It was for our dinner, and nothing else..
Dieting starts now again!
The big day is coming really soon...
I was inspired by the Soup Spoon to cook this.
I had their Meatless Minestrone Soup sometime last week.
& while I was drinking, I thought, hey I think I can make this too!


I did not use any canned tomatoes or beans because I wanna keep this soup healthy!
& used Organic 7 colours dried beans, there are 
  • Adzuki Beans
  • Mung Beans
  • Black Beans
  • Green Split Peas
  • White Kidney Beans
  • Red Split Lentils 
  • Yellow Split Lentils

All Natural Minestrone Soup (Serves 2)

8 Medium Sliced Tomatoes(I choose red ones)
400g Water/Vegetable broth (I used water)
2 Stalks of Cubed Celery
1 Medium Cubed Carrot
1 1/2 Cups of Shredded Cabbage
1/4 Cup of Pasta (I used Alphabet Pasta)
7 Colours Beans ( You can use any beans)
2 Tbsp Dried Basil
1tsp Soy Sauce/Salt

1. Soak beans in water for 4 hours or overnight.
2. Cook the beans and put in thermal cooker for 2 hours.
(Or you can simmer it on low heat)
3. Cook water, tomatoes and dried basil until tomatoes are soft, let it cool down then blend.
4. After blending, bring it back to heat and add in all other ingredients.
Simmer it on low heat or put in the thermal cooker for another 2 hours.
5. When vegetables are soft, season and serve.

Monday, October 25, 2010

Blood Nourishing Herbal Soup


Eu Yan Sang was having Sales @ Plaza Singapura's Atrium,
and i bought a couple of packets of herbs~to make soup~
My mum is the one who always makes soup for me.
now, I have to cook on my own.


Having a thermal cooker made the process simpler,
don't need to watch the fire or worry that water will dry up.
And it's cost effective...
just wash the herbs, put in pot with water and chicken.
Bring to a boil, remove from heat and wait for 3 hours.

3 hours later...
All nutrients packed in the soup...
This soup is meant to promote blood circulation,
I don't know how effective it is. HEHE..


look at the oil..Whoah..
I will try to replace with fish the next time!
Yummy!
But we can't get to sleep at night until 2am,
is it because of this soup?

Saturday, October 23, 2010

Steamed Saba with Miso Sauce


Steamed Saba with Miso Sauce!
my first time cooking this and I'm hooked onto it!
It's not the kind of authentic Japanese food, 
I used my own way to do it.
My humble try =)
It's a bit salty, so it goes really well with rice!
Officially addicted to it...


Steamed Saba with Miso Sauce


 2 Saba/Mackerel Fillets
3 Tbsp Water
1 tsp Chopped Ginger
1 Tbsp Dark Soy Sauce
1 Tbsp Miso 


1. Steam Saba/Mackerel for 5-8minutes on medium heat.
2. Prepare the sauce by adding water in saucepan, and when it comes to a boil,
cook the chopped ginger in it for about 2 minutes.
3. Stir dark soy sauce in, and remove saucepan from heat.
4. Add miso into the saucepan, and mix well.
5. Drizzle miso sauce onto steamed saba and serve.

Friday, October 22, 2010

Steamed Moist Chocolate Cake

We cook and bake for a very simple reason...

Yes..Love..
Why do we spend so much time in the kitchen,
when we can buy ready made food?
We just want the best for our love ones...
Homemade food is always the best food!
It takes lots of effort, time and sometimes courage to come up with something in the kitchen!
Ooooo..Emotional me...
Full stop before I type more =P


my man had a bad day,
I wanted him to cheer up~
by making this cake as a surprise.

Planned to complete the cake before he's back,
but was not in time to decorate.
He was still happy when he saw my "ugly" cake =)
I had problems with my steamer,
It's actually just a wok with a stainless steel stand. 
I should get a proper steamer soon!


the cake was indeed mooooooist~
the taste reminds me of Sara Lee...!
I did not drizzle it with ganache,
as i think this cake is sinful and sweet enough on its own! HAHA..
And in less than 12 hours, more than half the cake is gone!


Steamed Moist Chocolate Cake

185g Unsalted Butter
180g Castor Sugar
210ml Evaporated Milk
2 Eggs  (lightly beaten)
110g Top/Cake Flour
45g Good Quality Unsweetened Cocoa Powder
1/2 tsp Baking Powder
1/2 tsp Baking Soda
1/2 tsp Vanilla Extract/Essence


1. Heat up the steamer.
2. Lined and greased a 8 or 9 inch baking pan. (I used 7.5cm)
3. Combine castor sugar, evaporated milk, vanilla extract or essence and butter in a saucepan. 
Stir over low heat until sugar has dissolved and butter has melted, off fire and leave to cool.
4. Add the beaten eggs into the evaporated milk mixture and mix well.
5. Sift the flour, cocoa powder, baking powder and baking soda into a large mixing bowl.
6. Pour the eggs mixture over the flour and stir well (cake batter should be runny).
7. Pour the batter into prepared pan, cover the top of the pan loosely with a piece of aluminuim foil.
8. Steam over medium heat for 45 mins.
9. Cool the cake in pan before turning out for further decoration. 


Recipe Source From : Blessed Homemaker

Thursday, October 21, 2010

Udon in Homemade Chicken Broth

This is my simple lunch
I will just take whatever is available in my fridge,
and most of the time there will be no meat.
I used my few days old leftover chicken broth, if not I will just use plain water for the soup.
 I have too many chicken ribs in my freezer,
so got to use them to cook some broth and not let it go to waste.


I made the broth by boiling 4 chicken ribs for 2 minutes to get rid of blood residues and dirt
Then transfer the ribs to another pot of 1 litre boiling water.
Added some soya beans and let it come to a boil again.
Transfer pot into the thermal cooker and in a few hour's time there will be some tasty soup!


The ingredients to go with this udon are just fresh shitake mushrooms and cabbage.

Simple and quite healthy, it will be better without the broth  =)


Tuesday, October 19, 2010

Cottony Soft Honey Cake

I've made this cake once about 1 year ago, 
used a different brand of honey this time, and it taste totally different.
So if you want to make this cake, use your favourite honey! =)

Do not be deceived by the look of this cake...
It's extremely soft and texture is very smooth...
very cottony!
And it's quite a healthy cake!


Gave 1/2 of the cake to my family,
and the rest will be for my man's breakfast.
How weird it is..I don't crave for cakes that I've baked.
I will normally just take a small bite. Maybe I'm really not a fan of sweet stuffs.


Tried to capture the cottony texture,
hope all of you can see it  =)


Cottony Soft Honey Cake

4 Eggs (seperate whites from yolks)
20g Sugar
2 Tbsp Honey
85g Cake/Top Flour
2 Tbsp Oil
2 Tbsp Fresh/UHT Milk
1/4 tsp Cream of Tartar (I omit this)
50g Sugar

1. Preheat oven at 150 degrees
2. Add 20g of sugar into the egg yolks, beat until it turns pale yellow. Mix in honey, beat further till thick. 
Add in milk and oil, mix well.
3. Sieve  flour into egg yolk mixture slowly while folding. Leave it aside when it's done.
4. Beat the egg white till foamy and add in cream of tartar. Add 50g sugar in 2 additions. 
Beat till it becomes meringue like.
5. Fold in meringue into yolk mixture in 3 additions. Fold till mixed well after each addition.
6. Pour it into the cake mould. (I used 20cm pan)
7. Bake it in the preheated oven for 40 mins. or when the skewer comes out clean.

Recipe Source from: Leisure Cat

Monday, October 18, 2010

A Mini Housewarming + Gathering


My besties and their man came to my place for the first time...
I whipped up some food for them...

Spaghetti with homemade tomato sauce
this time, I added a can of Tomato sauce, the sauce was thicker.
I used tomatoes, carrots, capsicum and chicken breast as ingredients.


After dinner, I baked the brownies again.
served them warm with ice cream.
I love the mixture of temperature which gives me a thrilled feeling...

I hope they've enjoyed themselves... =) 

As for me, I'm tired now, 
was in & out of the kitchen from morning till night,
spent a long time arranging my groceries too!
I need some rest now =) 
recharging time starts now!

Friday, October 15, 2010

Oil-less Chocolate Sponge Cake

I love healthy recipes.
Most of the time, I will try to make healthy food,
and eat sinful food elsewhere...
For example, we don't fry food in our kitchen, but we eat potato chips & KFC!
So sometimes it's quite ironical..
And our size inflate and deflate fast~


 I was amused by this Sponge cake recipe which needs no oil at all...

It was soft & spongy


It's method is similar to chiffon cake's.
But I think there's some problem with this recipe, the directions are not clear, & some steps were skipped.
So I just tried my best to figure it out.

Everything was good, except that there were flour lumps in the cake,
I threw half of the cake away after my man ate it.

I will try this cake again, I guess.
But will still share the recipe with everyone, and translated to english.
Any1 daring enough to bake this then share the outcome with me?

Oil-less Chocolate Sponge Cake

35g Cake Flour
50g Corn Flour
Cocoa Powder 15g
4 Eggs
80g Sugar
2 tsp Vanilla Essence/Extract
Preheat oven at 180 degrees.
1. Separate yolks from whites.
2. Sieve flour thrice.
3. Beat egg whites till frothy and add sugar in 3 additions. Beat till it resembles meringue.
4. Mix a 1/2  portion of meringue & vanilla essence/extract to yolk batter & mix well.
5. Add flour in slowly and mix very well 
(Mine had flour lumps at this stage, maybe because I added all flour @ one go.)
6. Pour the batter back to the meringue and fold.
7. Bake for 30-40 minutes.
( I left my cake overturned in the oven for 10 mins after baking, with door ajar. So the height stayed.)
8. Let it cool completely before unmoulding.

Recipe Source from : Leisure Cat

Wednesday, October 13, 2010

KOREAN Campbell Early Hwaseong Grape


We don't really love grapes, 
and will not normally buy it.
But for this season, 
we have to buy many boxes!!
It just started! and I think it will last until December...
The Korean Hwaseong Grapes!!
It has a hint of grape wine smell..
Lovely~
It's sold at Fairprice, $3.99 for 1 box.
Last year, the price went down to as low as $2.99~
Such a good buy!
I'm waiting for the time and buy lots of them!


The soft and watery flesh~


Squeeze it gently and the skin peels off easily. 
imagine biting into it.
Wooooo...bursting into heaven~ HAHA!

Quickly grab!!

Tuesday, October 12, 2010

Introducing Piano!

This is my doggie, Piano~
For those who are new to my blog may not know Piano..
she's 5 years old~

Loves to eat! 
Loves to sleep!
Hi..My name is Piano!
I'm having Tummy Time with my Mummy!
So comfortable....


I love to observe things around me,
and sometimes stare into blank space...


Waiting for mummy to make some food for me....
I hope she can give me more food...
I'm always hungry ~~


I'm still waiting... =)

Oh by the way, Piano is a chihuahua! =p
you may think that she looks like a Pomeranian, 
because she's so much overweight!
I'm controlling her diet and she lost weight!
These photos were taken 2 months back. 
she looks slimmer now, and hope she will be healthier!

Monday, October 11, 2010

鸡蛋糕 Steamed Sponge Cake


My man loves to eat 鸡蛋糕 from young,
when he was younger, my mother in law will make it together with him.
So now, as his wife, I'm taking over the role of his mother.
We came up with our own recipe...
with some experiences in making sponge cakes,
I used that knowledge to gauge.


The result was quite good..and we used very basic ingredients..
It was spongy..
and i guess healthier, no butter, just 1 Tbsp of Oil.


I cut into 8 slices, I ate 1, and guess where's the rest?
His TUMMY! just like a kid =)
He's a good helper in our kitchen, I will ask him to get this and that, lots of requests!
But he's always willing to help.
Must really thank him for his patience and time.

So after my long story...
Wanna try our recipe?  =P


鸡蛋糕 Steamed Sponge Cake

5 Medium Eggs
190g Sugar
130g Cake Flour
1 tsp Baking Powder
2 Tbsp Custard Powder
1 Tbsp Oil

Preheat your steamer.
1. Add sugar to eggs and beat on high speed immediately after adding.
2. Turn to low when batter has nearly doubled in volume, thick and pale in colour.
3. Sieve in cake flour, baking powder and custard powder.
4. Beat for another 15 seconds on low speed.
5. Use a spatula and fold oil into the batter & at the same time
check for any excess flour not mixed into the batter.
6. Pour batter into a 20cm pan, use aluminum foil to cover it. Poke some holes in the foil. 
6. Steam on medium high heat for 30 minutes. 
(Check whether water has nearly dried up after 15 minutes of steaming, 
if yes, pour more hot water into the steamer)
7. Use a skewer or satay stick to poke right into the middle of the cake to check whether it's cooked,
if it comes out clean, it's done!
8. Remove from heat and let it cool in the pan on a wire rack.
9. When it has completely cooled down, unmould, slice and serve.

Sunday, October 10, 2010

Cold Kishimen

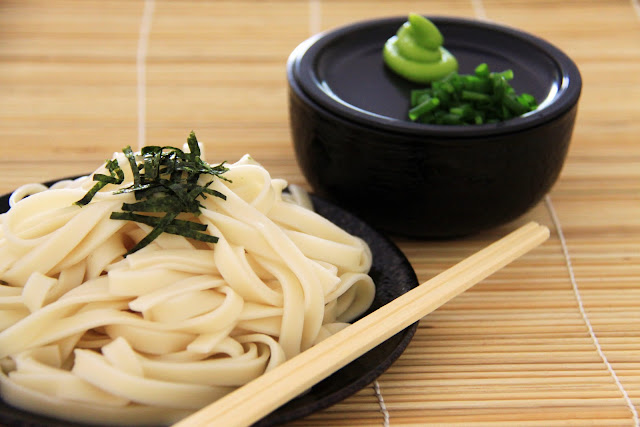
Kishimen is a broad, flat Japanese wheat noodle, which is slightly thicker and wider than Udon.
I bought mine from Daiso, a packet of it costs $2 and serves up to 3 persons. 
I found out about this noodle in Waraku few years back,
but a pity, they don't serve Kishimen anymore.
Theirs are the best! Super Q! 
But this Kishimen from Daiso is worth the money too! =)
Dinner's ready in a short time
Cook Kishimen in boiling water for about 10 minutes.
Prepare Soba sauce,
usually 1 part of sauce : 1 part of water.

Usually, I will soak the noodles in ice water until the ice have nearly melted.
then serve.


Soba sauce goes well with Wasabi...
I love the thrilling feel !


& the soba sauce+wasabi brings out the taste of the kishimen too...
A perfect match!!

Friday, October 8, 2010

Homemade Pasta


I've always wanted to make my own fresh pasta..
into heart shapes!
i did not use the rolling pin, 
so the dough was not pressed till thin.
should have done that, it's too thick!


After cooking the pasta, it's still chewy when it's hot/warm.
But when it cooled down, it became hard..
Quite disappointed...
I stir fried the pasta with frozen mixed vegetables and salmon...


Love those hearts...
I will try again!
when I succeed, will share the recipe =)

Thursday, October 7, 2010

The Fudgy Brownies!

This is my 3rd batch of brownies!
Gave to my students and their siblings as children's day presents.
I wanna give them the freshest bake, so I made this 3 times in less than a week.

And those brownies were well received!


Believe me..this is the easiest recipe which yields excellent fudgy brownies!
Just melt, add, mix and bake. Simple!
After having experience in baking these, I altered the recipe & it was even better for my last batch..


All wrapped up and since it's fudgy, 
it gets a bit messy!

One of my student saw it, and gave me the disgusted look thinking what's that,
she said she doesn't want it!
I was so sad, and gave both packets to her brother.
After awhile, she took the brownies and ate it.
She asked me, you really made these? 
It's very nice!
And she kept asking, whether it's really baked by me.
If it's true, why am I carrying a bakery's paper bag. *FAINT*
But yeah, means that this brownie recipe is worth a try for all ! =)


The Fudgy Brownies

170g Butter
270g Sugar
1 tsp Vanilla Essence/Extract
3 Eggs
30g Cocoa Powder
120g All Purpose Flour
1/4 tsp Salt
1/2 tsp Baking Powder
One large handful of Chocolate Chips


Preheat oven @ 180 degrees. Line tracing paper on your pan. (I used 30cm x 22cm pan)
1. Melt butter with very low heat, when it has completely melted, remove from heat.
2. Add sugar into melted butter and mix well.
3. Mix vanilla essence/extract in.
4. Beat eggs in one at a time, mixing well after each addition
5. Sieve cocoa powder, flour, salt and baking powder into the mixture. Stir until there's just a little trace of flour, do not over stir.
6. Lastly, chocolate chips to be added, and stir again until there's no trace of flour seen.
7. Bake for 25 minutes. Don't worry if it's still soft to touch.
8. Remove from oven and let it cool completely before slicing. If you like it warm, you may slice it before it cools.
9. Sieve some icing sugar onto the brownies and serve.

Recipe Source from : All Recipes

Wednesday, October 6, 2010

Vegetarian Pasta With Homemade Sauce


I used the leftover homemade pizza sauce as pasta sauce...You can find the recipe HERE
The meal is done in less than 30minutes..


the ingredients were leftovers too..
Olives, Capsicums, Mushroom mix...
Just cook pasta as directed on package, but I did not add any salt or oil as stated.
Heat pasta sauce, add in all ingredients and let it simmer till ingredients are cooked.
Top pasta with sauce and sprinkle with black pepper. Serve!
As easy as that  =)


Pick up the fork and spoon and lets tuck in!

Tuesday, October 5, 2010

Homemade Vegetarian Pizza & Pizza Sauce

 My little sister wrote that! =)

I was planning for this meal since last week,
but was too busy to make them.
Today, my man's on MC, so we made the pizza together! 
He was in charged in chopping the ingredients... and kneading the dough,
because I accidentally cut my finger earlier. 
My small ceramic knife is really super sharp!!

Ok..back to the pizza topic..
This is a really good spice blend, very fragrant! 
& I used canned black pitted olives. 
It's not as good as fresh ones, but a lot cheaper. 
Just $2+ per can!


I made the sauce, as I don't wanna use those store bought ones.


a mix of white button, swiss brown and portobello mushrooms..


1 rectangular pizza...


1 round pizza...


And here's the baked pizza~
baked with love and filled with team spirits...
but lack of time to capture more pictures of the baked pizzas.
My family joined us for dinner and when dinner time starts, it's like at war zone.
 everybody grabbing the food!! HAHA!!


Anyway..today is a fruitful day for us...
and of course, enjoyable..!


Homemade Vegetarian Pizza & Pizza Sauce


Pizza Sauce
7 Diced Medium Size Tomatoes
2 Diced Yellow Onions
60g Ketchup
1 tsp Salt
2 Tbsp Spice Blend (Basil, Oregano are the basic spices needed)
2 Tbsp Black Pepper
1 Tbsp Oil

1. Heat up oil in pot and stir fry onion until soft.
2. Add diced tomatoes in, switch to low heat and let it simmer till mushy. Stirring occasionally.
3. Add 1/2 portion of spice blend and black pepper.
4. Remove from heat and let cool.
5. When it has cooled down, puree it.
6. Bring the pot back on low heat and stir in ketchup, remaining spice and black pepper.
7. When it comes to boil, remove from heat and set aside.


Note: You can use the leftover sauce to go with some yummy pasta/spaghetti.


Toppings
Capsicums (Green/Yellow/Red)
Mushrooms (White Button/ Swiss Brown/ Portobello)
Black Pitted Olives


Pizza Dough (Makes about 2 pizzas)
530g Flour ( Mixture of 300g of Plain Flour & 230g of Bread Flour)
300ml Water
1 tsp Salt
1 1/2 tsp Instant Yeast
1 Tbsp Oil

1.  Mix all dry ingredients together and make a well in the middle.
2. Add water and oil into the well slowly, and keep mixing with a spatula.
Do not add water at one go. Mix until you get a sticky dough.
3. Start to knead the dough with your hands or with a mixer using dough hooks.
4. Knead for about 20 minutes if using hand, and 10 minutes by mixer, until it becomes non sticky.
5. Shape into a round dough and leave in oven to proof until it doubles in size.
6. Punch the dough down to remove air.
7. Divide dough into 2, and let it proof for another 30 minutes.
8. Punch the doughs down and shape as desired. 
9. Place it on pan and lay pizza sauce over the dough, 
followed by toppings then shredded mozarella cheese.
10. Bake at preheated oven of 210degress for approximately 30 minutes or until golden brown.
11. Serve hot.