Wednesday, September 29, 2010

简单的伊府麵


 The deep fried golden 伊府麵 (Yee Fu Noodles)
 Normally, it's served in the restaurants with straw mushrooms and yellow chives.
 This 伊府麵 that I've bought is kind of special, it's thicker and more springy~ 
$3.50 for a very big packet which serves 6.
I bought it @ 广祥太 it's very near Aljunied MRT & my mummy goes there quite often to get their housebrand condiments.
Their 陈年老抽 is fantastic! very thick and dark!
 Accidentally bought the regular kind and there's really a difference between them~


My family came over for dinner~
& I used this simple dish to serve them... 
Springy noodles cooked in 10 minutes....Must try!


简单的伊府麵 

1 packet of 伊府麵
Fishcakes(Cut into bite sizes)
1 can of Straw Mushrooms
1 bunch of Yellow Chives
Garlic 
Water 
2 Tbsp of Light Soy Sauce
2 - 3 Tbsp of Dark Soy Sauce 
1 Tbsp of Sesame Oil 
Spring Onion/Chinese Celery for garnish
------------------------------------------------

1.  Preheat the wok and drizzle with some oil. Stir fry the garlic.
2. Put fishcakes & straw mushrooms in and continue stirring for 1/2 minute.
3.  Add yellow chives, and pour water into the wok,
till it covers 3/4 of the ingredients' height.
4. Add all seasonings in and mix well.
5. Place  伊府麵 in the wok and keep stirring &
flipping to make sure the noodles are cooked evenly.
6. When water has nearly dried up, remove from heat and serve.
7. Garnish the noodles with spring onion/chinese celery.

Tuesday, September 28, 2010

Non Bake Oreo Cheesecake

This is my third time making cheesecake,
but a total new recipe and not into a pan this time round.
The recipe doesn't call for lemon juice.
The previous ones that I've tried were a tad too sour because of the juice.
And after trying this recipe from Jess @ Bakericious
my conclusion is...it's heavenly!
My man kept saying it's good it's good non stop while eating.

I made it into individual cups so there will not be an overdose of calories & fats!
when there's a whole cake, we will not count how many slices we've eaten.
Made 11 cups in total, 8 will be given to my family.

If you love Orea and Cheesecake,
this is definitely the cake to go for!


8"   Non Bake Oreo Cheesecake

Biscuit Base:
100 gm Digestive Biscuits - crushed with roller
50 gm melted butter
( I crushed Oreo with cream, and did not add any butter, but it's better to use butter to make the crust firm)

Mix them together and press into an 8" springform tin. Chill it.


Cream Cheese Filling:
250 gm Cream cheese
50 gm Icing sugar
1 Tbsp Maple Syrup (I used honey)
60 ml milk
1/4 tsp vanilla extract
10 Oreo cookies - chopped coarsely
260 ml whipped cream - whipped till medium peak
1 Tbsp gelatine powder + 70 gm water

Some extra crushed Oreo Cookies for sprinkling on top

Method:
1. Measure water into a bowl and sprinkle in the gelatin (without stirring with a spoon). Set aside to allow the gelatin grains to swell (10 mins) before setting the bowl over a pot of simmering hot water. Stir with a spoon and once the gelatin melts, remove the bowl from the pot and set aside to cool to room temperature)
2. Beat cream cheese with icing sugar till well combined.
3. Add in fresh milk and mix till well combined. Add in gelatine mixture and mix well.
4. Fold in whipped cream and divide mixture into 2 portions.
5. Fold in chopped Oreo cookies into 1 portion and maple syrup or honey and vanilla extract into the other portion.
6. Pour in the white portion into the chilled biscuit base. Level the cream cheese filling and put it into the fridge to let it set.
7. Pour the Oreo cream cheese filling onto the set white cream cheese and level it.
8. Put into the fridge to let it set for 2 to 3 hours. (put in freezer to have ice cream alike texture)
9. Remove from freezer to decorate as desired and put back to freeze it.


Monday, September 27, 2010

The Easy & Healthy Bibimbap


Another fast and easy dish to share!
Photobucket
Basically, I cook the minced garlic, 1 shredded carrot, 1 shredded zucchini and mushrooms without oil...
replace oil with water.
plus poach an egg...


Photobucket
Add a tablespoon of hot pepper paste to the veg and rice. 
Done!

Oh..wait a minute..
How did I poach the star shaped egg?

Photobucket
Put mould on heated non stick pan,
Crack egg into a bowl, then transfer it into the mould.
Pour water into the pan and let it simmer.
When it's nearly cooked, 
run a stick/chopstick round the sides of the mould,
when it's cooked, use a turner and take it out carefully.
Easy and healthy!

Saturday, September 25, 2010

The Nutritious Saba Rice


Another method to cook Saba, the very nutritious fish.
Fairprice was having a promotion, 8 pieces of frozen saba for just $7+!
That's such a good bargain!
I must admit that it's not as good as those bought in Sakuraya Fish Market, 
but still decent enough to be eaten =)

This recipe is super easy...
Just put all ingredients +  pan fried saba into the rice cooker and press the start button!
after 15 minutes...it's all done!
No hassle, No oily kitchen
Photobucket
You can smell the fragrance during the cooking process~


Photobucket
Enjoy the nutritious meal for 2!
I made the Tamago to add a side dish to the rice.

Wanna try making this?


The Nutritious Saba Rice (serves 2)

1/4 Cabbage
Photobucket
1/2 Packet of Shimeji Mushrooms
1 Small Shredded Carrot
2 Pieces of Saba (Pan fried for 1 min. on each side)
3/4 Cup of Short Grain Rice
1 1/4 cup of water
1 Tbsp Soy Sauce
1 Tbsp Sesame Oil
Pepper


1. Mix rice grain, water & all seasoning together in the rice cooker.
2. Lay Shimeji mushrooms, cabbage and shredded carrot on top of the grain.
3. Lastly, place pan fried Saba on top of all ingredients & press the start button!
4. When it's cooked, take Saba out carefully and stir the rice. 
5. Serve rice in a bowl and top with Saba and any other side dishes.
6. Enjoy!                                                                                                                

Stir Fried Vegetarian Bee Hoon Without Oil

I always have my lunch alone.
Most of the time at home, 
because some days I will only leave home to teach in the afternoon.

So I can decide what to cook. 
Sometimes I will just cook instant noodles and add some ingredients to it but I try to limit it, 
the most once or twice a week. 
Normally there will be no meat in my lunch, 
only tofu, mushrooms and vegetables.


This is my version of healthy Stir Fried Vegetarian Bee Hoon..
Without any oil...
You must be wondering how to stir fry things without oil...
My way is to use water instead of oil...!
I often use this method to stir fry my vegetables..
& nobody knows it unless I tell.
i know they will go like..YUCKS if i were to let them know...


So here's the bee hoon without oil!
Photobucket
It looks the same as those stir fried with oil ones right?
I feel that it's flavour is really good enough!
If you are going on a diet, try this! It's low in calorie..and filling!


Stir Fried Vegetarian Bee Hoon Without Oil (Serves 1)

A bunch of brown rice bee hoon (soaked)
A bunch of vegetables
1/4 packet of Shimeji Mushrooms
1 small shredded carrot
A handful of wolfberries (washed & soaked in warm water for 1 minute)
1 Tbsp Minced Garlic
Approx. 1 cup water
1 tsp soy sauce + 1 tsp dark soy sauce + pepper


1.  Use 2 Tbsp of water from 1cup of water and bring to boil in wok, add in garlic, keep mixing it until fragrant.
2. Add Shimeji Mushrooms and stir fry for 1/2 minute.
3. Mix seasoning into the 1 cup of water and pour into the wok.
4. Put Bee Hoon in the wok, and keep stirring until the water nearly dry up.
5. Add vegetables and carrot. Cook for 1 minute.
6. Lastly, mix wolfberries+ water into bee hoon and cook until the water nearly dry up once again. If you find it too dry, just add more water before serving.
7. Serve hot.

Friday, September 24, 2010

Our First Photoshoot =)


Photoshoot finally done!
& now we are waiting for the time to choose some pictures to be printed in the album...

Initially I wasn't excited at all, because I know I'm still fat.
But after looking at myself in the mirror after all the make up,
I feel satisfied. HAHA!
So strange...


My man....
Look suave? Hehehehehe....


I had a change of 6 outfits and 5 hairdos...
which is alot to me!
Luckily my hair can still withstand the severe damage done,
and did not drop as much as I thought.


Here's my first outfit and a sly smile..HEHE
I think my friends will not recognise me if they were to see me like this on the streets!
Seriously, this doesn't look like me at all.. HAHA
I went to Ikea with this outfit, abit too formal i guess...
wanted to wear casual clothing, but it will not match with my hairdo and make up,
so changed it last minute before setting off to Ikea!


my 2nd outdoor outfit...
Really fat...
but I feel like there's more motivation in me to wanna slim down further now! 


my indoor studio wedding gown...
I'm glad that my actual day wedding gowns will not be the ones in my photo album,
that means i can wear more gowns! =)

Wednesday, September 22, 2010

Strawberry and Kiwi Milk...


The weather was seriously warm and humid for the past few days...
and finally, it rained today....
For me, I have to travel and rainy days are actually bad for me...
but still, I enjoy the cool cool weather~rather than a hot one, which makes me sweat like a pig....


I made this few days ago....
Very easy to make!
Just blend strawberries, kiwi, milk and some sugar/honey together.
I did not add any sugar/honey, so it's not that sweet..
But still refreshing~!
Nice drink for summer! =)

Monday, September 20, 2010

Happy Advance Mid-Autumn Festival !

Time flies..the Lunar 7th month is over..
now it's the Mid Autumn Festival.

I miss those good old times... playing with lanterns and fire..
burning the grass in our yard...eating mooncakes and pomelo with tea...
Somehow, as we grow older, it becomes more dull....
sad huh? HAHA! Oops..we should be happy!
=)

To brighten up the festival, 
I made some snowskin monncake for my love ones....!
 This is my first attempt in making mooncakes!
I made everything from scratch, even the lotus paste~
it was challenging, I burnt the first batch of lotus paste. 
Wasted! 
Lucky it turned out nicer in my 2nd attempt,
but still not as ideal. 
Hope my family will still like it...


Guess what are these? 
Rabbits?? Piggies?? Monsters??
It's actually rabbits!
They are rather fat~~so don't really look like rabbits..

the skin was relatively dry and hard to mould. I followed the recipe closely,
but the same thing happened for my 2 batches.
I really don't know what's wrong...

 I will try another recipe for my next attempt.
I'm having my bridal photoshoot tmr, so will only have time to make the next batch on the festival itself.

Hope it will turn out well =)
& I will bake some mooncakes next year!

Okonomiyaki お好み焼き


Okonomiyaki is a Japanese savoury pancake.
Mine's packed with cabbage and carrots. No meat.
As for commercial ones, they will add either bacon or seafood, and many more varieties.
For me, I wanna keep it simple, as it's my first time making~!

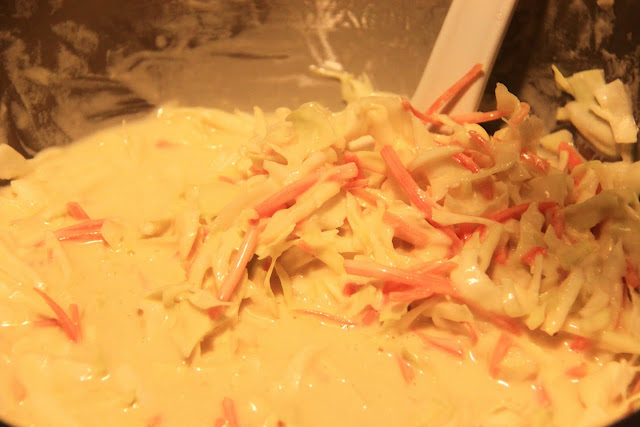
To get the pancake mixture, just follow these few simple steps.
1. Mix 2 cups of all purpose flour with approximately 1 3/4 of water, whisk till smooth.
2. Beat 3 small eggs in and mix well. Do not overstir.
3. Add 1 tsp of Dashi Granules for seasoning.
4. Mix in 1/2 shredded cabbage and 3 small shredded carrots.
5. Get ready to pan fry them in a non stick pan!


I bought okonomiyki sauce and Japanese mayonnaise, they are really important in this recipe. Okonomiyaki sauce is not cheap in Singapore,
it costs about $5.80 for a small bottle. I will try to make the sauce on my own soon.


And not forgetting the Bonito Flakes!
We call it " dancing flakes", because they will move like they are doing some graceful ballet moves. HEHE!


Yeah! With those simple steps + drizzling okonomiyaki sauce and mayonnaise onto the cooked pancake...


Top the pancake with some bonito flakes & it tastes just like store bought ones!
I think the sauce and mayonnaise play a big part~ Get good ones, and it will be perfect!


Yum Yum Yum Yum!

Friday, September 17, 2010

Rosemary Cold Pasta

The menu...
Made these at night and it's meant for next day's lunch...
So convenient!


I used Penne...


My new wallies! =)


Completed! & I feel that something is missing....
Some crunchiness and sweetness!


So I added some fuji apple bites!
A weird combination?
Drizzle with lemon juice, mix, it's super refreshing!!


Rosemary Cold Pasta (Serves 2)

300g Pasta
1 Tbsp Olive Oil
1/2 tsp salt
1 Tbsp Black Pepper
1 Tbsp Chopped Rosemary 
100g Frozen Mix Vegetables
1 Fuji Apple 
2 Tbsp Mayonnaise/Miracle Whip
1/2 Lemon


1. Cook Pasta as directed on package. When it's cooked, drain. 
2. Stir oilive oil, black pepper, rosemary into the hot pasta.
3. Cook/steam the frozen mix vegetables for 3 minutes.
4. Mix with the seasoned pasta and let cool.
5. Cut the fuji apple into bite size and soak in salted water for 3minutes.
6. Add fuji apple and mayonnaise/miracle whip to pasta, and stir well.
7. Drizzle with lemon juice, mix and best served cold.

Thursday, September 16, 2010

I Heart Wallies

I bought some wallies sometime back and did not have the motivation to use them,
until last Sunday....
Just simply lazy..HEHE
These cows are situated just beside my dining table...
No beef to be served in our house  =)
Because they are sooo cute!
The main reason for me to cut down on my meat intake,
is not to hurt those animals as much as possible.

you can see that there's no meat in my dishes most of the time..
but...I can't live without fish yet...


A small corner which will be decorated with pots of flowers soon..I HOPE.. =)


Our main door...
Lovely warm words which welcome us home everyday~~


I have more wallies to put on~ hope that my inspiration will come soon...again...
so that I can get my work done!

Wednesday, September 15, 2010

水煮龙头鱼 Bombay Ducks

 What are these??
Bombay Ducks! In our family we call them 软骨鱼...
because of their soft bones.
Actually, they have many different names...
they are not popular in the markets, I guess it's because they are filled with bones


Knowing that we love to eat these, the fishmonger will call and inform my mummy when it's available~
and she will buy 8-9kg each time!
Cutting their head, getting their guts out, cutting the fins and washing them take up hours!
I used to help her in doing all these,
but recently, I realised that I dread handling seafood,
the smell of it lingers around me until the end of the day.
I can live without other meats but I can't live without fish! Ahhh!!
What should I do? HAHA!


OK enough of crap..
here's how I cooked mine...
Normally, I will boil a pot of water, dump the fish in...
when it has come to another boil, season the water with light soy sauce, sesame oil, pepper and shaoxing wine.

You know...this is even tastier when fried! Can even eat the bones!


The soup is actually sweet...
and it came from the fish...


Tons of bones in there...


I was sent to A & E sometime last year as a tiny bone was stuck in my throat.
HAHA! 20 years of  experience in eating Bombay Ducks and this happened to me!
And the worst case is, they can't find the bone in xrays...
in the end the doctor asked, do you have any family history of mental illnesses?
OH MY GOODNESS! 
They suspected that I was having some illusion..
people who have mental illnesses will imagine that there's fish bone stuck in their throat..!

But yeah, thank goodness, after looking into my throat, there's really a fish bone in there!
What an experience~~!!

So the moral of the story is...when you are eating Bombay Ducks, be extremely careful!
Although I'm still not careful now  =p

Tuesday, September 14, 2010

Peanut Shells Korean Rice Cakes

This is the first time I've seen korean rice cakes in this shape...
Was amused by it!


Aren't they cute?


My family was coming over for dinner, and I decided to serve them this...
Actually I cook this dish rather often, as it doesn't need lots of preparation and cooking time.
And nonetheless, mouthwatering! =)


All ready..and waiting for them to come...


The spicy korean rice cake~sorry for messy presentation
  =p


The next time, I will omit the franks and use some fresh ingredients,
as you know that these are not that healthy...

You can find the recipe in my previous post...HERE

Monday, September 13, 2010

Rosemary Salmon & Sinless Chilled Mashed Potatoes


We love salmon.. =)

OK i know..by now..you've seen us loving lots of food...
everything is our favourite~ 
But one of our enjoyment in life is dining & chatting together...
it's a form of relaxation...
Oven grilled salmon...
This time round, I blended garlic & rosemary, saves time as I don't need to chop them.
Mixed them with canola oil and lots of black pepper, season salmon for 1hour.
Carrots and tomatoes were grilled together with the salmon.
@ 190 degrees for 30 minutes..


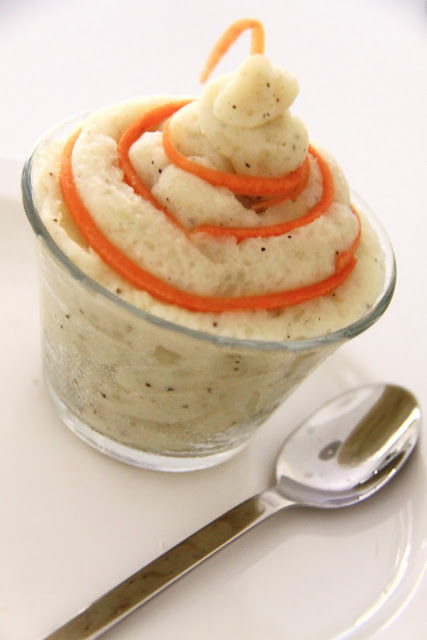
This is my Sinless Chilled Mashed Potatoes...
It's soft and fluffy...
but there's no oil in there...


A very funny design which I've thought of...
My man laughed so hard when he saw it!


Very plain and refreshing....
Good for weight watchers~
How did I make mine?


Sinless Chilled Mashed Potatoes (Serves 2)


320g boiled russet potatoes (peeled)
100ml low fat fresh milk
1/2 tsp salt
1/2 tsp black pepper


1. Mash potatoes with masher till fine.
2. Add in milk gradually and stir continuously to blend well.
3. Mix salt and black pepper into mashed potatoes.
4. Scoop/pipe into serving plate/bowl. Chill. Best served cold.

Note: 
Some of you may find it too bland, but I like the light taste. If you want it to be more salty, add more salt. 
And perhaps you want it to taste even better, just mix 2 Tbsp of butter into it! = p